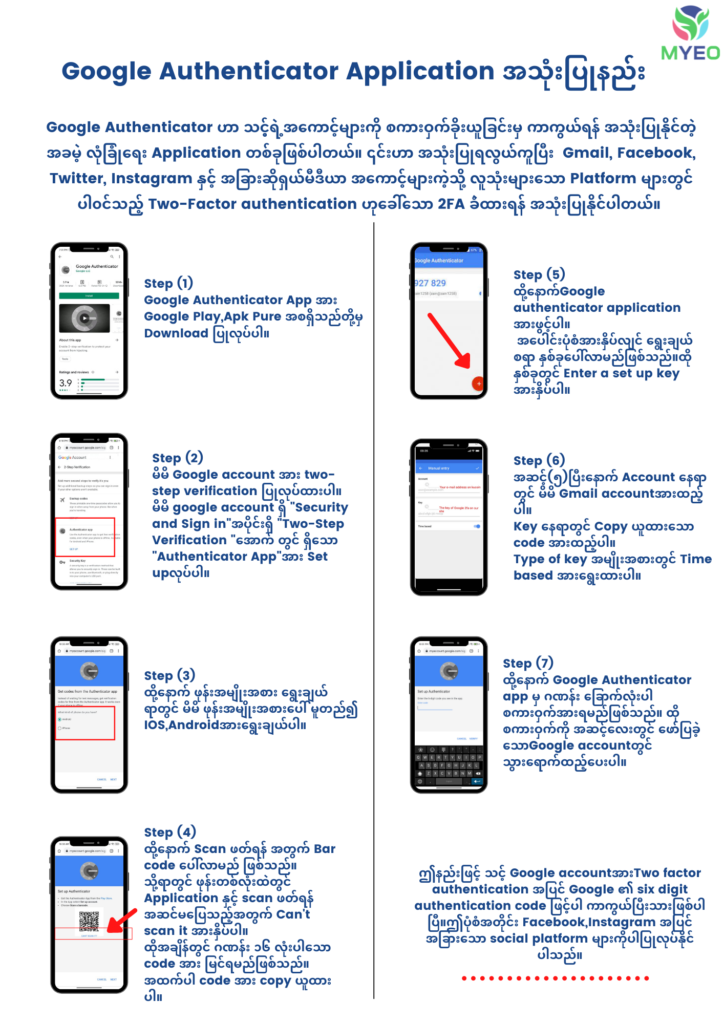
📱Google Authenticatorက သင့် အကောင့်တွေရဲ့ စကားဝှက်ခိုးယူရရှိပြီးနောက် ဝင်ရောက် အသုံးချခြင်းကနေ ကာကွယ်ဖို့ အသုံးပြုနိုင်တဲ့ အခမဲ့ လုံခြုံရေး Application တစ်ခုဖြစ်ပါတယ်။ ဒီအရာက အသုံးပြုရလွယ်ကူပြီး Gmail, Facebook, Twitter, Instagram နဲ့ အခြားဆိုရှယ်မီဒီယာ အကောင့်တွေလို လူသုံးများတဲ့ Platformတွေမှာ ပါ၀င်တဲ့ Two-Factor authentication (2FA) ဖြစ်ပါတယ်။
🔸အဆင့် (၁)
Google Authenticator Appကို Google Play, Apkpure အစရှိတဲ့ နေရာတွေမှာ Download ပြုလုပ်ပါ။
🔸အဆင့် (၂)
မိမိ Google account ကို two-step verification ပြုလုပ်ထားပါ။ မိမိ google account ရှိ “Security and Sign in” အပိုင်းရှိ “Two-Step Verification “အောက်မှာ ရှိတဲ့ “Authenticator App”ကို ရွေးချယ်ပါ။
🔸အဆင့် (၃)
အဲ့ဒီနောက် ဖုန်းအမျိုးအစား ရွေးချယ်ရာမှာ မိမိ ဖုန်းအမျိုးအစားပေါ် မူတည်ပြီး IOS, Androidကို ရွေးချယ်ပါ။
🔸အဆင့် (၄)
အဲ့ဒီနောက် Scan ဖတ်ဖို့အတွက် Barcode ပေါ်လာမှာ ဖြစ်ပါတယ်။ ဖုန်းတစ်လုံးထဲမှာ Application နဲ့ scan ဖတ်ဖို့ အဆင်မပြေတဲ့အတွက် Can’t read scan ကိုနှိပ်ပါ။ အဲ့အချိန်မှာ ဂဏန်း ၁၆ လုံးပါတဲ့ code ကို မြင်ရမှာ ဖြစ်ပါတယ်။ အထက်ပါ codeတွေကို copy ယူထားပါ။အဲ့ဒီနောက် next အားနှိပ်ထားပါ။
🔸အဆင့် (၅)
Google authenticator application ကို ဖွင့်ပါ။ အပေါင်းပုံစံအားနှိပ်ရင် ရွေးချယ်စရာ နှစ်ခုပေါ်လာမှာ ဖြစ်ပါတယ်။ အဲ့ဒီနှစ်ခုမှာ Enter a set up key ကို နှိပ်ပါ။
🔸အဆင့် (၆)
အဆင့်(၅) ပြီးနောက် Account နေရာမှာ မိမိ Gmail accountကို ထည့်ပါ။ Key နေရာမှာ Copy ယူထားတဲ့ codeကို ထည့်ပါ။ Type of key အမျိုးအစားမှာ Time based ကို ရွေးထားပါ။
🔸အဆင့် (၇)
အဲ့ဒီနောက် Google Authenticator appကနေ ဂဏန်း ခြောက်လုံးပါတဲ့ စကားဝှက်ကို ရရှိမှာ ဖြစ်ပါတယ်။ စကားဝှက်ကို အဆင့်လေးမှာ ဖော်ပြခဲ့တဲ့ Google accountမှာ သွားရောက်ထည့်ပေးပါ။
💁🏻♂️ဒီနည်းလမ်းနဲ့ သင့် Google accountကို Two factor authentication အပြင် Google ရဲ့ six digit authentication codeကိုပါ ကာကွယ်ပြီးသားဖြစ်ပါပြီ။ ဒီပုံစံအတိုင်း Facebook, Instagram အပြင် အခြား social platformတွေကိုပါ ပြုလုပ်နိုင်ပါတယ်။
ပုံနဲ့အတူ အသေးစိတ် တစ်ဆင့်ချင်းလေ့လာဖို့အတွက် အောက်မှာ လေ့လာကြည့်နိုင်ပါတယ်။